Archive for Photoshop techniques

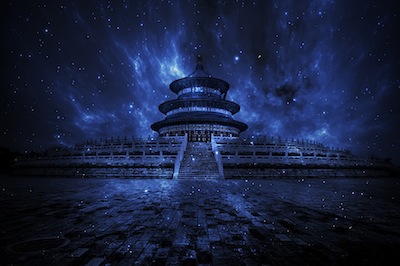
Inspirations – Temple of Heaven by Christian Ortiz

Posted in Inspirations with tags , , on December 28, 2011 by sabrina

© Christian Ortiz

Nikon D700, 14-24mm f/2.8 at 1/2500s ISO 200

I had seen boring pictures of the Temple of Heaven before and I wanted to capture a much more grandiose photo of it against a blazing sunrise. Unfortunately, Beijing has a bit of a pollution problem and the one day I was there I was greeted by a flat gray sky and about 1,000 tourists swarming all over the poor temple. I decided to work with what I had and see if I could spice it up in post production.  I walked around the massive structure looking for an area with minimal human density. When I found this angle, I set up my ultra wide angle lens to 14mm on a full frame D700 sitting on top of a tripod with a remote control trigger. I then began the long 37 minute wait for all the giddy school girls to finish taking pictures of their friends holding up the peace sign. I saw an opening and I fired out my shot. When I got home I liked most of the photograph, but the gray sky was so dull that I decided to take it in a more creative direction. This was the Temple of Heaven so I wanted to give it a celestial feel. I searched stock photos for a space background that seemed fitting and I purchased it and used it as my background.  I set the blending mode in Photoshop to multiply and added a layer mask to punch through the important details of the temple. I then used curve adjustments to bring out more of the intricate detail and finished it off with some unsharp mask. Making this photo was an an enjoyable exercise in unobstructed, child-like creative flow that we often don’t allow ourselves to indulge in for fear of not being taken seriously.  ~ Christian Ortiz
The Weekly Photo – July 4, 2011

Posted in Art of Photography, Image Processing and Software, Instruction, TCBlog, VWBlog with tags , , , , , , , , , , , , , on July 4, 2011 by Darwin

The image below was taken on the Spring Photo Tour in the Canadian Rockies – this is of Abraham Lake from Windy point with a rain storm over Kiska Peak. I used a Canon 24mm TS-E lens tilted to give max apparent DOF. Lately I have been processing my colour images with the B+W conversion program Nik Silver Efex Pro 2. First I process the RAW image the way I want it to look in Camera RAW using Photoshop CS-5 (see original image in this post). Then I convert the image to a pleasing B+W using Silver Efex watching carefully to get the tones in the image exactly the way I want them. I layer the original processed colour image over the converted Silver Efex B+W image in Photoshop and then change the blending mode of the colour layer to “Color”. The result is an image with the contrast of the processed B+W but with the colours of the original file. Remember you can get 15% off of Silver Efex using my name for the discount code at checkout  – darwin (not darren!). In a future post I will have a step-by-step ‘recipe’ of how to make funky colour images using Silver Efex Pro 2. Of course, some people will prefer the original, some will like the conversion – but knowing how to use the tools given to you, you’ll be able to produce images that please your eye (and in the end that is all that matters).

©Darwin Wiggett - Silver Efex Pro 2 conversion

©Darwin Wiggett - original colour image

Photo Contest Reminder

Posted in Good News, Monthly Photo Contest, TCBlog with tags , , , , , on February 26, 2011 by Darwin

Don’t forget to enter the Visual Wilderness Photo Contest themed American Landscape for a chance to win a four-part webinar by Jay and Varina Patel called Nature Photography and iHDR Workflow which includes sessions on Nature Photography: Equipment and Research, RAW Processing, Layers and Masks in Photoshop, and iHDR Workflow. Show us your best landscape photo from the good ole USA. Good luck, deadline is Feb. 28, 2011 at midnight Eastern standard time.


©Darwin Wiggett - Deadhorse Point, Utah